General features
To select several items at once
Where multi-selection is available, you can select several items at once. The
commands you use affect all the selected items. Multi-selection works in most
lists.
To select items one by one, scroll to the item and press and hold down Ctrl + space
bar.

©2001 Nokia Mobile Phones. All rights reserved.
26
G
enera
l informa
tion
To select a larger set of consecutive items, paint the items by pressing and holding
Shift + using the
∧
and
∨
arrows on the Arrows key or the space bar.
Multi-selection is cleared when you press the Esc key.
Special characters
The character key Chr, on the communicator keyboard is used to create characters
that are not included on the keyboard. The character key can always be used when
you are able to enter characters from the keyboard.
Note: Some special characters may get distorted when sent out of your
communicator. This happens in, for example, mail or short messages, and
is because of differences in network protocols.
To insert special characters from the character table
1 Press and release the Chr key. A dialog opens.
2 Press the Menu key to select the page with the character you want to insert..
3 Select the special character or characters, then press Insert.
To insert special characters from the keyboard
Either, press and hold the Chr key and simultaneously press a key with a special
character printed on the key as the third character.
Or, to generate special characters by using certain unmarked keys, for example, “a”
and “e”, do as follows:
1 Press and hold the Chr key and simultaneously press a letter key. The first
special character matching the letter key is displayed.

©2001 Nokia Mobile Phones. All rights reserved.
27
G
enera
l informa
tion
2 Continue to hold down the Chr key and press the letter key again. The second
special character is shown in place of the first one, and so on, until the first
character is shown again.
The case of the special character is determined by whether Shift or the Caps
lock key has been pressed.
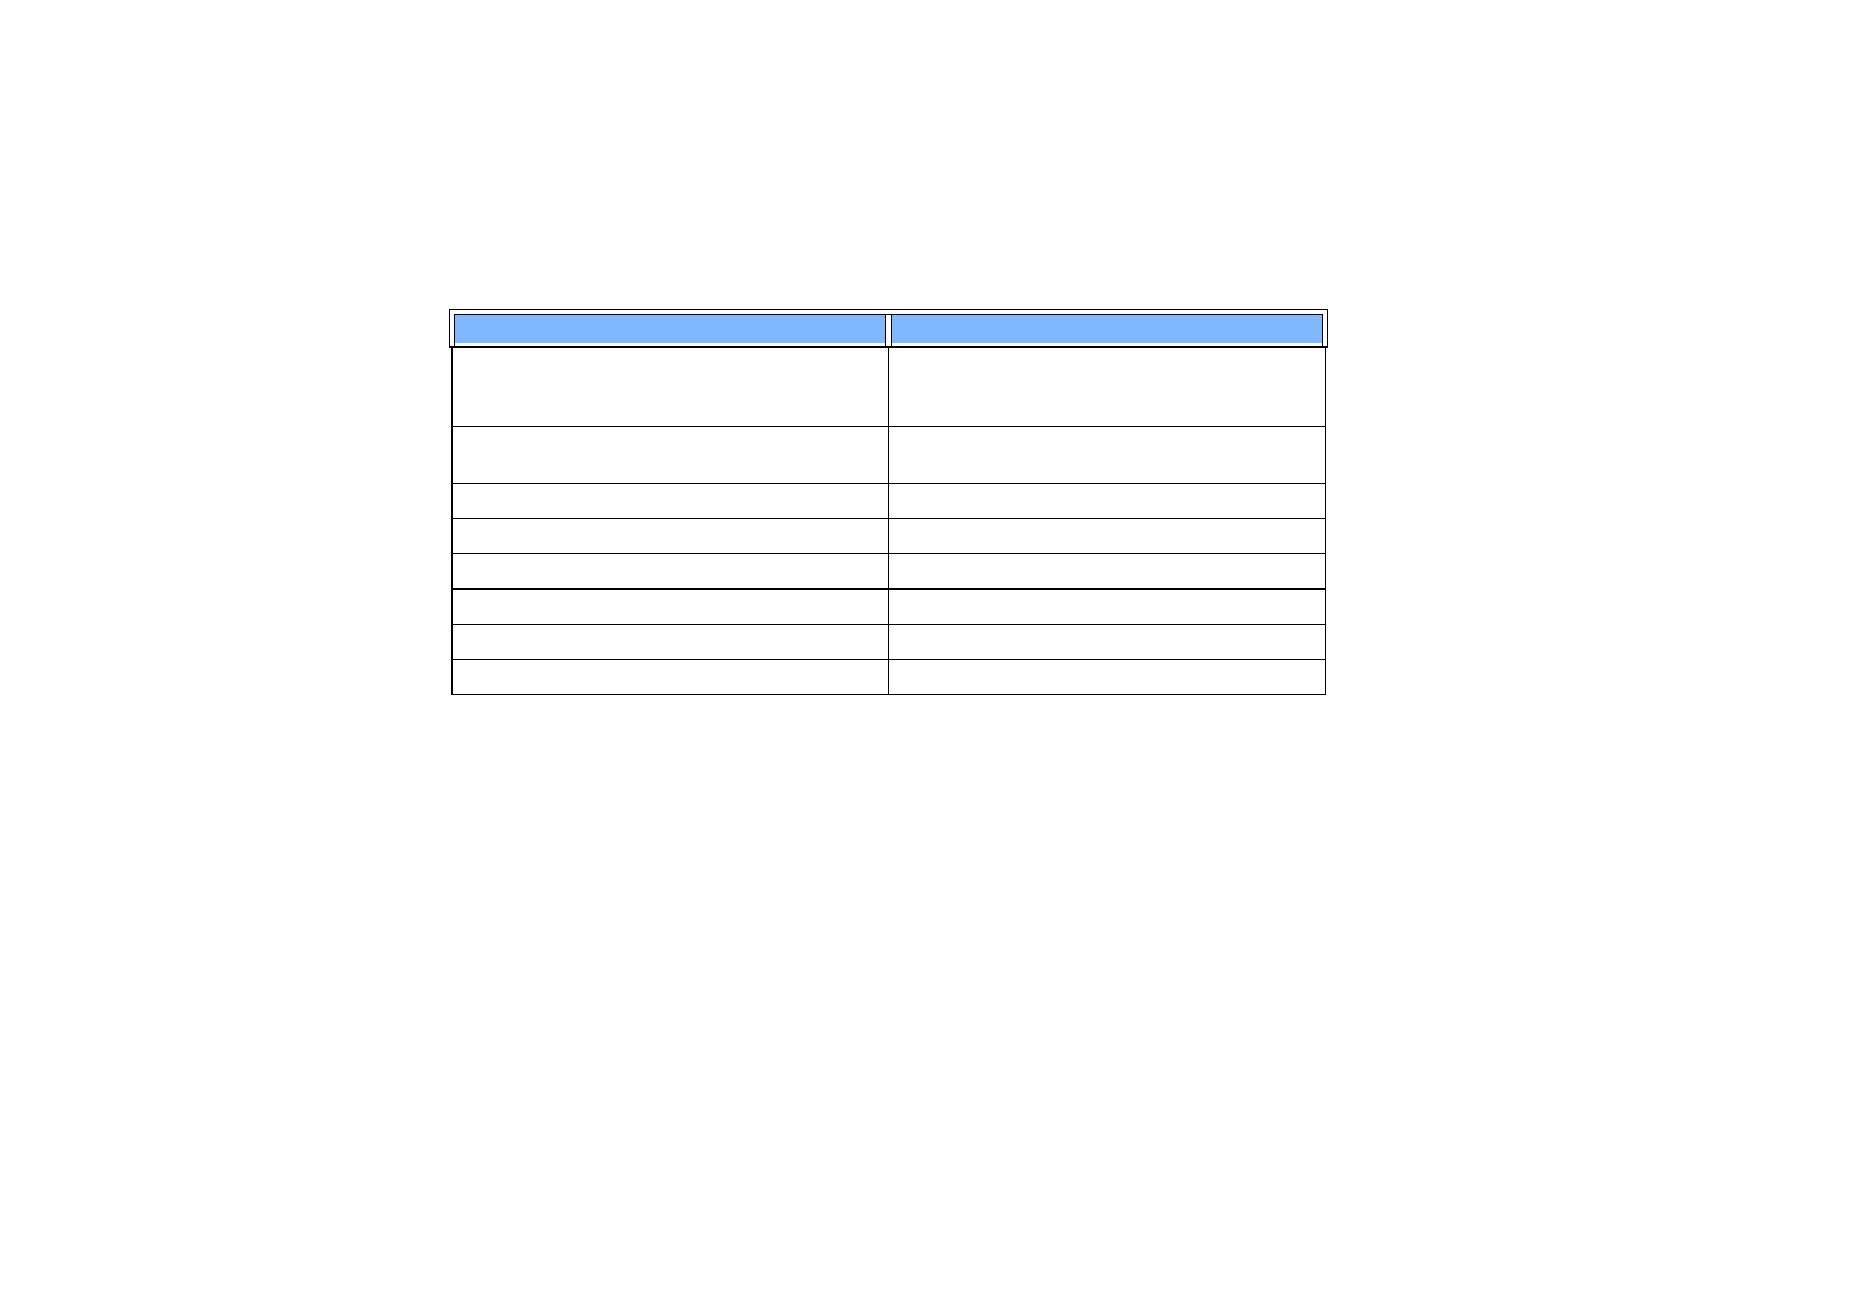
Shortcuts
Tip: You can find more
shortcuts in the menus on
the display of the
communicator interface.
There are several shortcuts you can use in the document applications. The shorcuts
vary depending on the application used. The following table lists some of the
available shortcuts:
Shortcut
Function
Ctrl + a
Ctrl + c
Ctrl + x
Ctrl + v
Ctrl + z
Selects all
Copies selected text
Cuts selected text
Pastes selected text
Undoes (the last action)
Ctrl + b
Ctrl + i
Ctrl + u
Applies bold
Applies italics
Applies underlining
Ctrl + t
Ctrl + d
Full screen mode (if available)
Deletes files, messages, shortcuts and other items.
Ctrl + p
Print or Properties
©2001 Nokia Mobile Phones. All rights reserved.
28
G
enera
l informa
tion
To save files
When you close a new file for the first time, or want to save it, you will be asked
to enter a name for the file and to identify a folder in which it should be saved.
Ctrl + n
Ctrl + o
Ctrl + e
Creates a new file
Open
Close
Ctrl + s
Ctrl + Shift + s
Save
Save As
Chr + left/right arrow (on Arrows key)
Moves the cursor to the beginning or end of the line
Chr + up/down arrow (on Arrows key)
Moves up or down a page
Chr + Ctrl + up/down arrow (on Arrows key)
Moves to start or end of document
Shift + Ctrl + left/right arrow (on Arrows key)
Selects the previous or next word
Shift + right/left/up/down arrow (on Arrows key)
Selects one text character or line
Shift + Chr + up/down arrow (on Arrows key)
Selects text, page by page, inside a document
Shortcut
Function
©2001 Nokia Mobile Phones. All rights reserved.
29
G
enera
l informa
tion
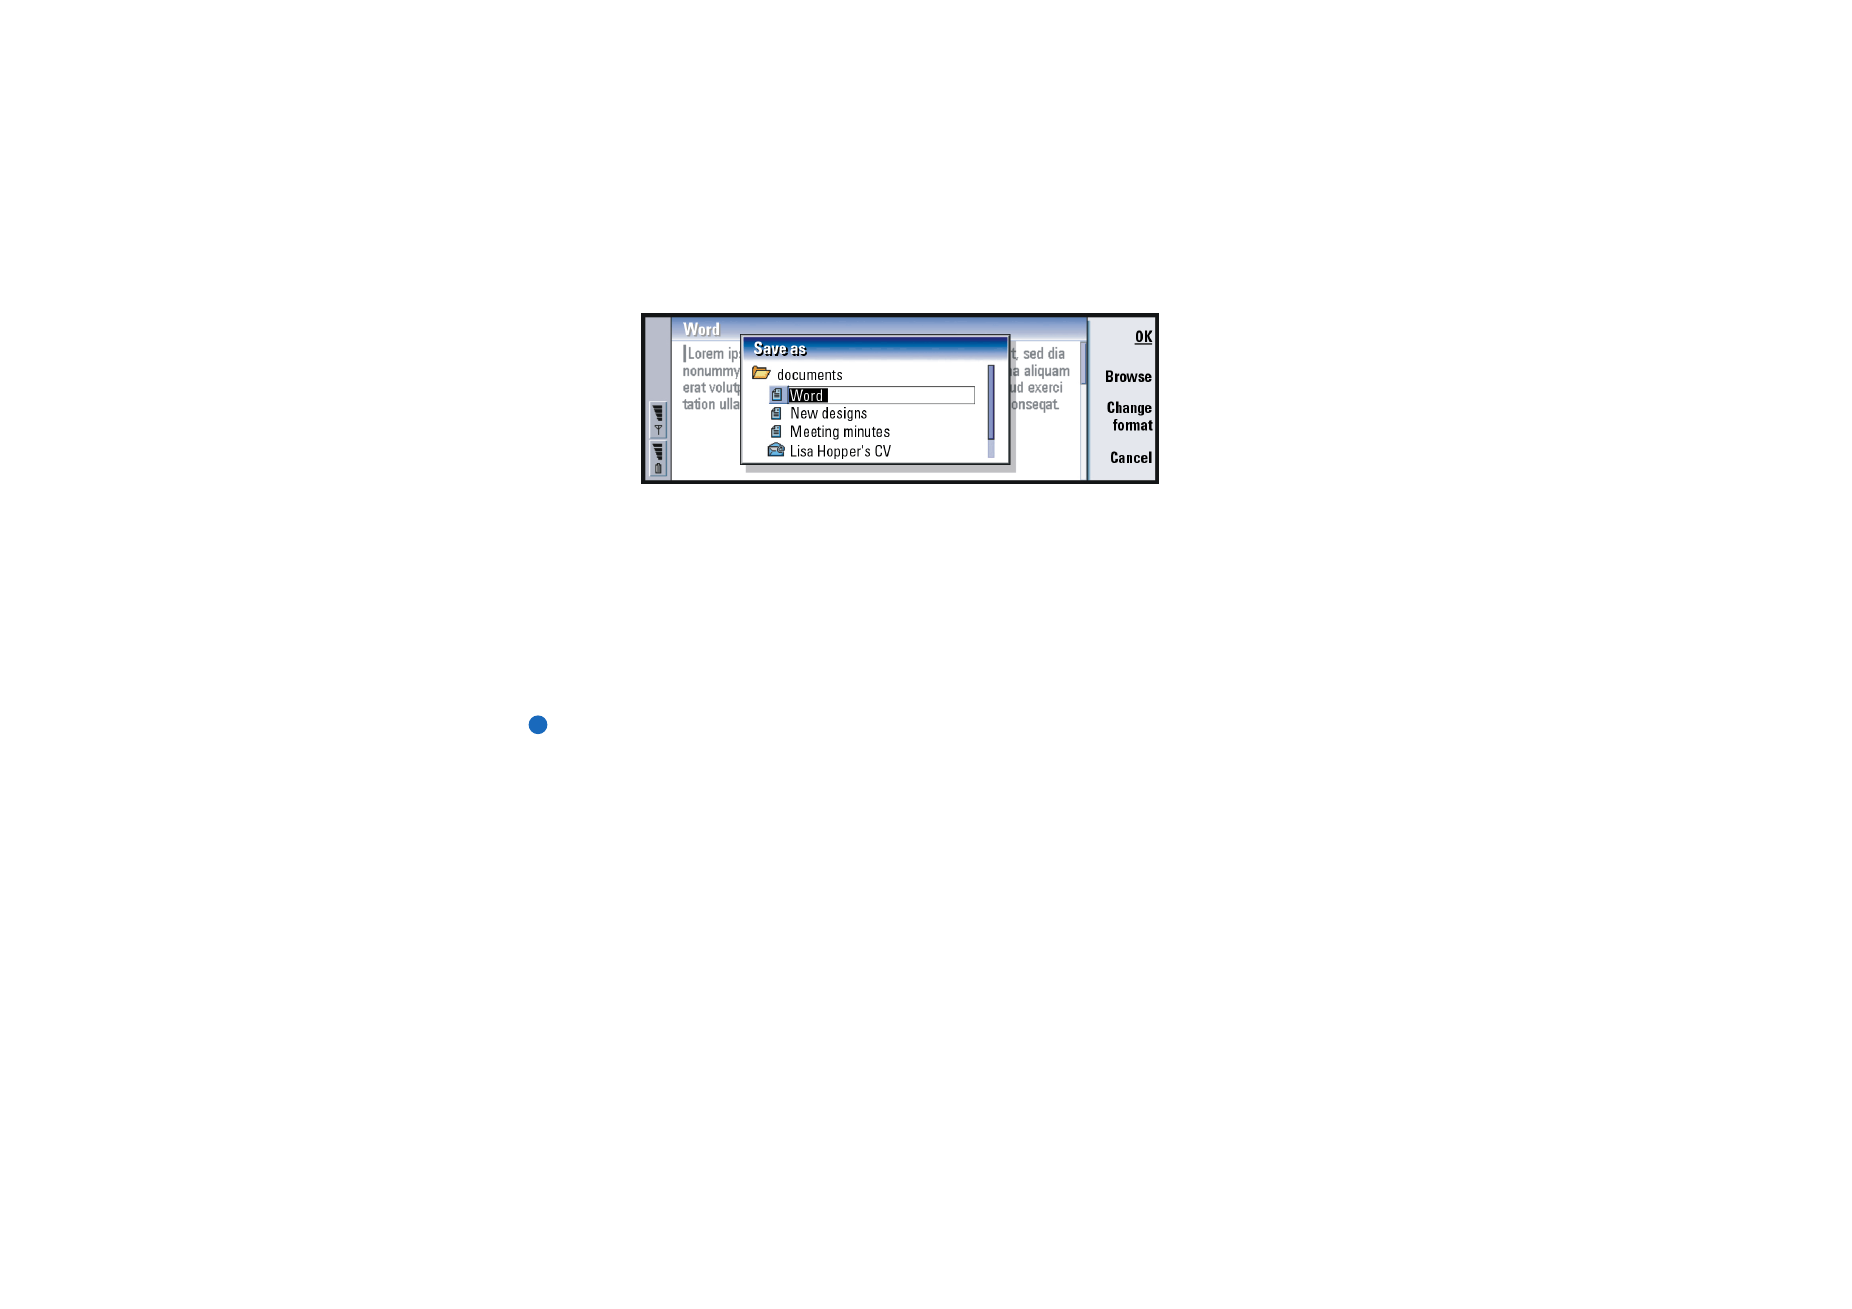
Figure 10
The following commands become available in the dialog:
OK - Confirms the name of the document.
Browse - Opens a dialog in which you can browse for a location where you save
your file.
Change format - Opens a list of formats. You can now change the format of the
document being saved.
Cancel - No saving is done and the dialog is closed.
Note: If you do not want to save the file, press the Menu key and select File>
Discard changes, then close the file.
To send documents
In addition to sending messages in Messaging application you can also send
documents out of the communicator in the applications where the Send function
is available on the Menu list.
As a fax - You can send the document as a fax.
As a mail - You can send the document as a mail message.

©2001 Nokia Mobile Phones. All rights reserved.
30
G
enera
l informa
tion
As a short message - You can send the document as a short message.
Via infrared - You can send the document via infrared.
Note: When you open a document, the document is opened in the appropriate
editor or viewer. The commands vary according to the editor/viewer.
To search for text
You can search for text strings in the applications where this function is available
on the Menu list.
1 Press the Menu key and select Edit > Find…. A dialog opens.
2 Type the text string in the search field and press Find.
3 Once a text string match is found, it is highlighted.
To find out if there are more of the same text strings in the document, press
Find next.
4 To redefine the search, press Options. A dialog opens where you can define
options of Case sensitive or Match whole word.
To replace text
1 Select a piece of text, press the Menu key, and select Edit > Find…. Or,
search for a text string with the Find function explained above, and press
Replace. A dialog opens.
2 Type the text string in Replace with: field.
3 To replace all the matching text strings in the document, press Options. A
dialog opens; select Yes.

©2001 Nokia Mobile Phones. All rights reserved.
31
G
enera
l informa
tion
Tip: Replace all is
available only if you have
selected Yes in the Replace
all dialog.
4 Press Replace or Replace all.
To check spelling
Note: You can spell check only English text and words.
You can check words and text for spelling in the applications where Spell check… is
available on the Menu list. To be able to use this function, you first need to install
the Spell checker from the CD-ROM found in the sales package of your
communicator. For details, see ‘To install software from the CD-ROM’ on page 34.
Tip: You can select
individual words to spell
check. Otherwise the whole
text is searched and spell
checked.
1 Press the Menu key and select Tools > Spell check…. If the Spell checker comes
across a word it does not recognise, a dialog opens.
2 You can type in the correction in the correction field. Or, move to the
Suggestions field and press the Tab or Enter keys to open a list of suggestions.
3 Select a word from the list of suggestions, then press Replace to accept the
correction or suggestion.
4 If during step 2 you want to add an unrecognised word to the dictionary, press
Add.
To print
You can print various items, such as documents, pictures, faxes, mails, and short
messages.
Note: For further information on supported printers, see the Forum Nokia home
page on the World Wide Web at www.forum.nokia.com
Refer to the user’s guide of the printer for detailed safety instructions on the
printing device.
©2001 Nokia Mobile Phones. All rights reserved.
32
G
enera
l informa
tion
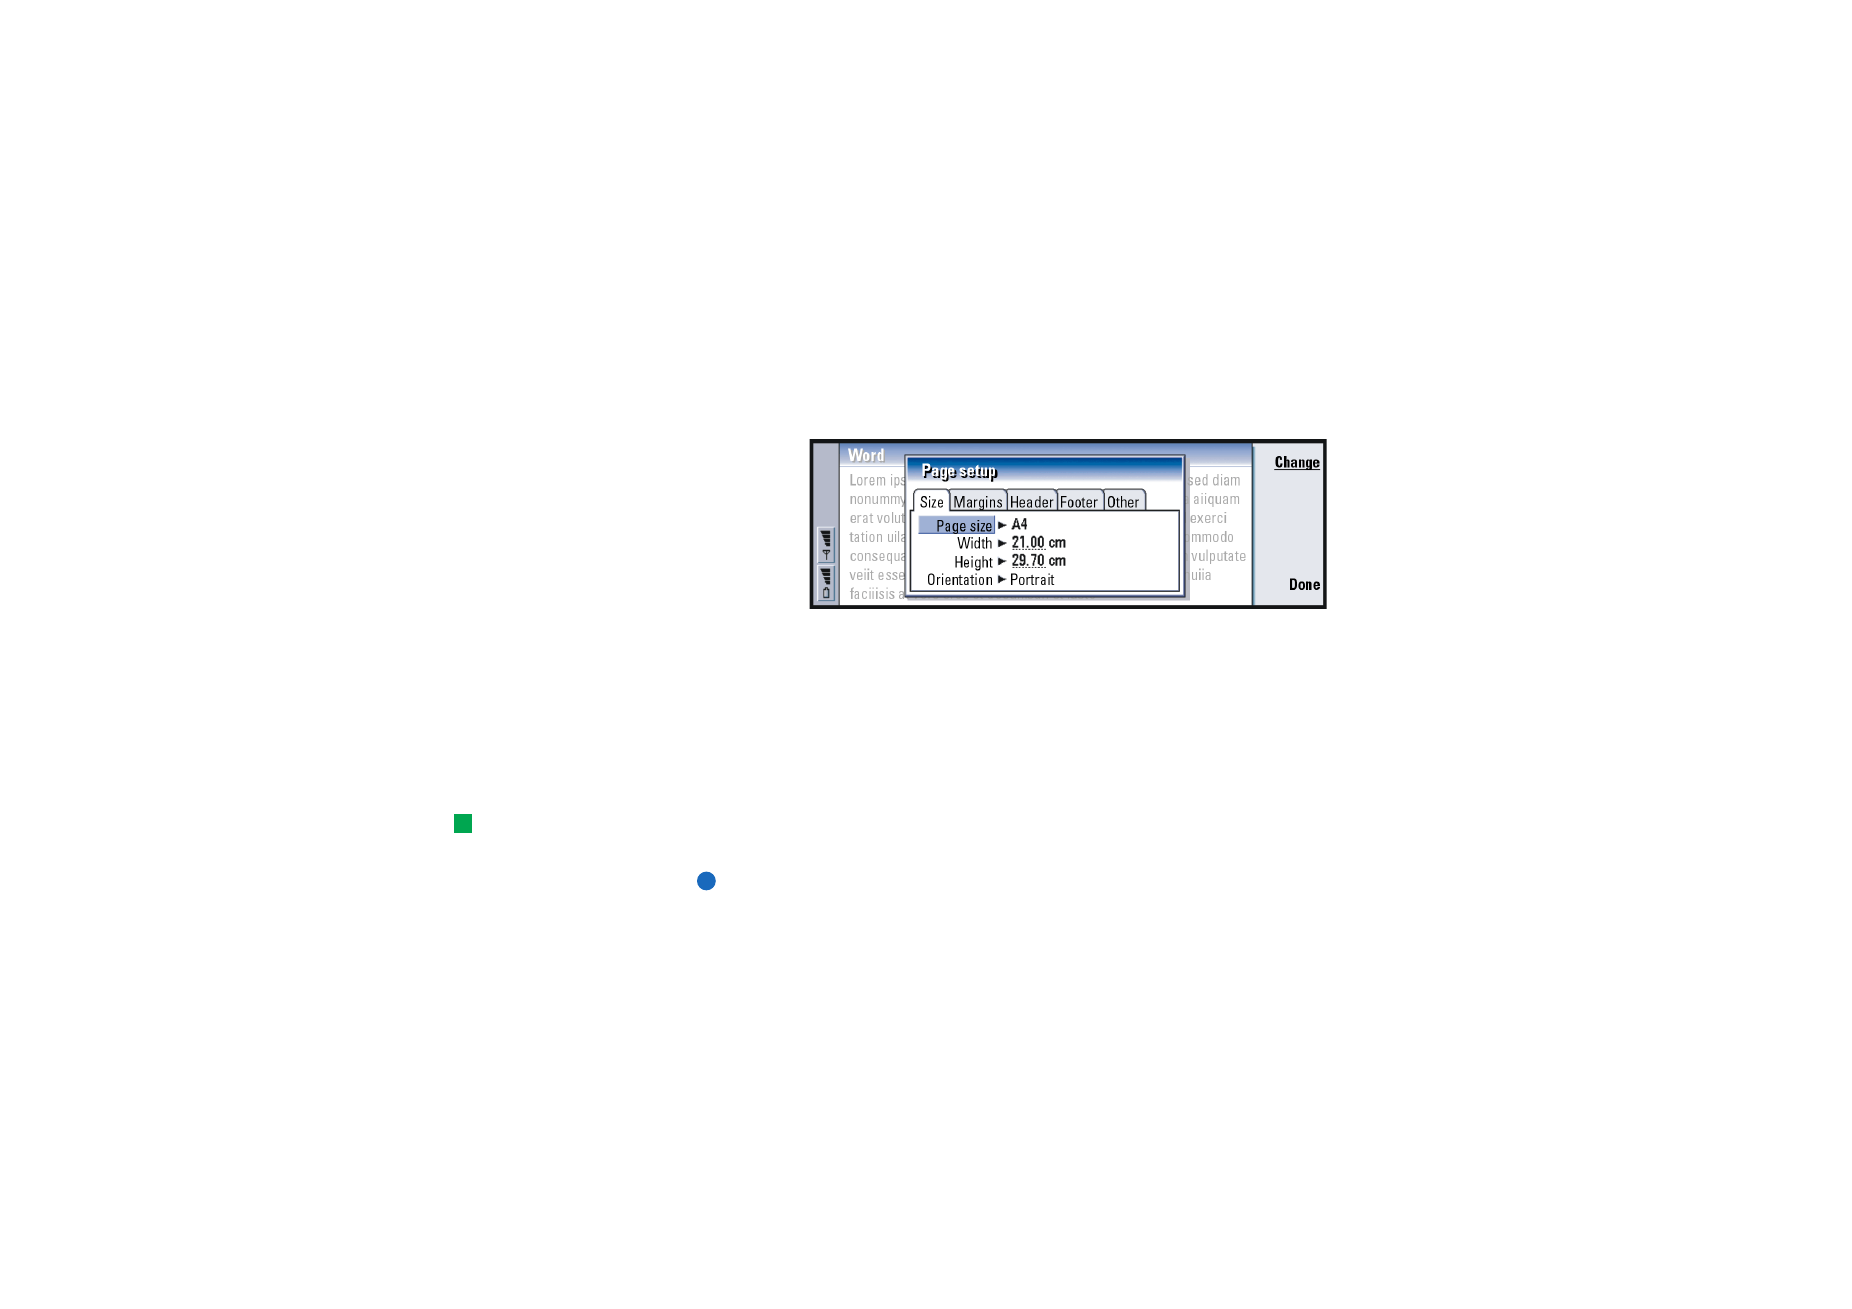
1 Press the Menu key and select File > Printing > Print…. A note appears, showing
the print range, connection type, and printer used.
2 Press Print. To change the printing options, press Options.
3 To preview what you are about to print, press Print preview. A dialog opens.
To define page setup, press Page setup.
Figure 11
When printing via infrared, make sure that the infrared port of the communicator
faces the infrared port of the printer. Keep the infrared connection clear. If the
connection is obstructed for too long, for example, if something is moved between
the infrared sensors or the communicator is moved, printing is interrupted. For
details on infrared connection, see page 35.
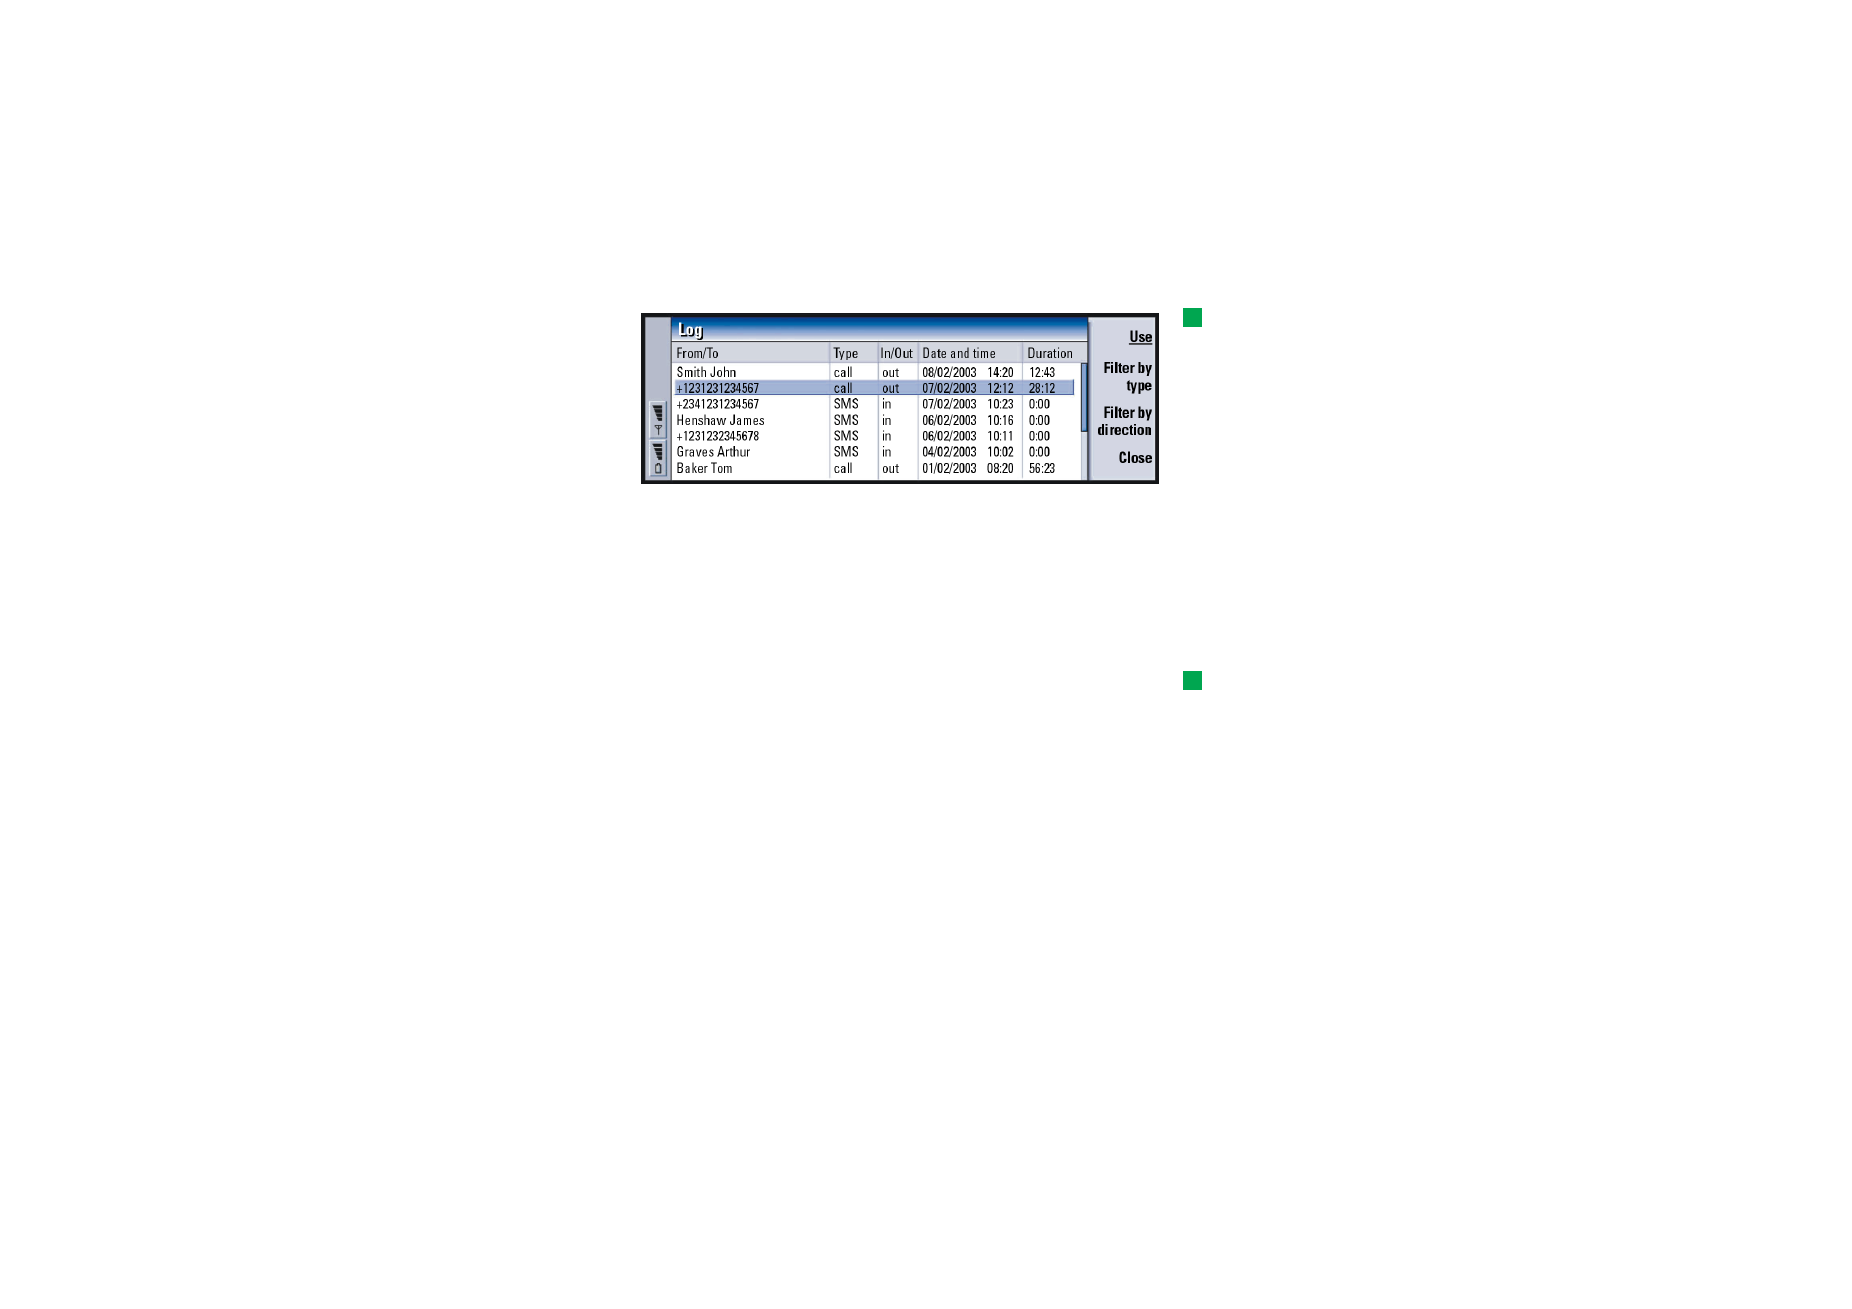
Log
Tip: With log files you
can monitor your
communications, use the
information to create or
complete contact cards, or
reply directly to the sender
in the log.
Log contains information about the communication history of your communicator.
The log shows all, or certain types of communication events in chronological order.
Note: Remote mailbox, WAP, and Internet connections are logged as data calls.
©2001 Nokia Mobile Phones. All rights reserved.
33
G
enera
l informa
tion
Tip: To change the
categories Date and time and
Duration to Subject and
Status, press < and > on the
Arrows key.
Figure 12
To access the log
You can access the log from the Menu of several applications.
Press the Menu key and select Tools > Log.
To make use of an individual communication event
1 Choose a log event and press Use. The command buttons change.
Tip: A communication
type can have one of the
following delivery statuses:
pending, delivered, failed,
sent, not sent, and scheduled.
2 You can now do the following: send a fax or short message to the contact, call
the contact, or add the contact to your Contacts directory. Check the command
buttons for available options.
To view only certain communication types
1 Press Filter by type to choose a communication type you want to view.
Press Filter by direction to choose whether you want to view communications
originated by you or by the remote party.
2 Select from the options.
3 Press OK.

©2001 Nokia Mobile Phones. All rights reserved.
34
G
enera
l informa
tion
To erase the contents of the log
Log events remain in the log database for only a set number of days after which
they are automatically erased to free memory on your communicator. To redefine
the number of days, press the Menu key and select Tools > Log duration….
1 To erase some or all the contents of the log, press the Menu key and select File
> Clear log….
2 Type in the date. All log events with an earlier date will be removed from the
log.
3 Press Clear.